How to Organize a Tiny Apartment Kitchen
A small kitchen works when the things you use daily are within reach and everything else is out of the way. Here is how to get there in an afternoon, one cupboard at a time.
In this article
- What you need to know first
- Step 1: Empty and edit
- Step 2: Set up zones
- Step 3: Measure before you buy anything
- Step 4: Use the full height of every cupboard
- Step 5: Bring the back of base cupboards to the front
- Step 6: Put the doors and walls to work
- Step 7: Clear the counter
- Step 8: Add a surface if you need one
- Step 9: Tame the under-sink cupboard
- Products that can help
- Common mistakes to avoid
- What to do next
- Frequently asked questions
What you need to know first
A small kitchen rarely needs more cupboards. It needs the cupboards it has to work harder. Tiny kitchens fail for two reasons: too many things, and the wrong things in the best spots. Organizers help only after you fix both.
Most kitchen cabinets also waste the top half of every shelf, the back of every door and the whole space under the sink. Shelves are spaced for tall items such as cereal boxes, while plates, mugs and tins are short. Deep base cabinets hide things at the back, and what you cannot see you buy twice.
Set aside an afternoon, clear the counter, and work through the steps in order. None of it needs a drill.
Step 1: Empty and edit
Take everything out of one cupboard at a time. Doing the whole kitchen at once ends with everything on the floor.
Keep what you have used in the last few months. Let go of duplicates, gadgets that do one job you rarely do, chipped mugs and lidless containers. Most small kitchens run well on two pans, one large pot, a baking tray, a few good knives and tableware for a few more people than live there.
Step 2: Set up zones
Store things where you use them:
- Cooking: pans, utensils, oils and spices next to the hob (stove).
- Preparation: knives, boards and bowls near the longest clear stretch of counter.
- Cleaning: soap, cloths and bin bags under or beside the sink.
- Drinks: mugs, tea and coffee next to the kettle.
Daily items go between hip and eye height. Weekly items go low or high. Rarely used items go on the top shelf or leave the kitchen altogether.
Step 3: Measure before you buy anything
Write down the inside width, depth and shelf height of each cupboard, including the depth with the door closed. Organizers that are a centimetre too wide go back to the shop. The storage calculator helps you work out how much space you have and need.
Step 4: Use the full height of every cupboard
Most cupboards waste the top half of each shelf.
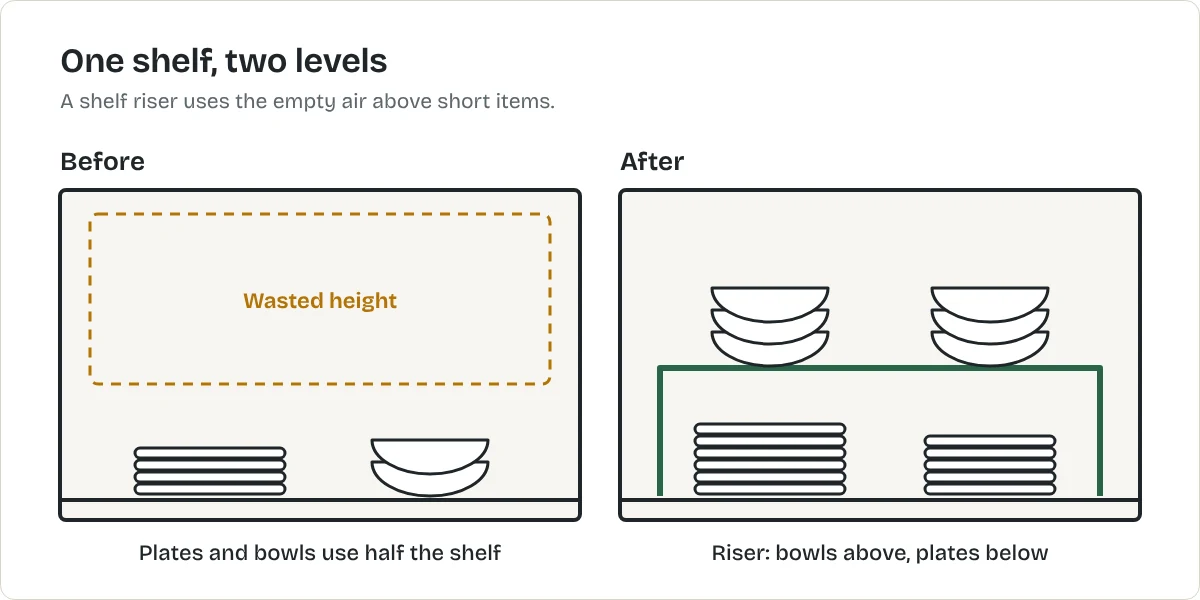
Fix that with:
- Shelf risers that create a second level for plates and mugs. For the money, this is the most useful kitchen organizer.
- Stacking containers for dry goods, labelled on the front.
- Under-shelf baskets that hang from the shelf above, for light things such as wraps and tea towels.
- Vertical dividers so baking trays and boards stand on edge and slide out one at a time.
Step 5: Bring the back of base cupboards to the front
Deep base cabinets work best when things pull out. A freestanding pull-out basket sits on the cabinet floor with no screws. Nest pans by size and store lids upright in a rack, like files, so you can take one out without lifting the stack.
Step 6: Put the doors and walls to work
- The inside of cupboard doors can hold lids, wraps and cleaning cloths on adhesive hooks or slim racks. Check that the door still closes.
- An over-the-door rack turns a pantry or utility door into shelves for tins and bottles.
- A magnetic strip keeps knives off the counter. Adhesive versions exist for renters, but knives are heavy and sharp: check the weight rating, and read what adhesive hooks and strips really hold before you trust one.
- A rail with hooks, or a row of adhesive hooks, holds utensils and mugs.
- The side of the fridge takes magnetic racks for spices and paper towels.
Step 7: Clear the counter
Counter space is working space. Keep out only what you use every day, such as the kettle and one or two appliances. Group oil, salt and utensils on a tray so they move as one when you wipe down.
If the counter is dark as well as crowded, stick-on lights under the wall cabinets help; see how to brighten a dark apartment without rewiring.
Step 8: Add a surface if you need one
If there is floor space, a slim rolling cart adds storage and a work surface, and it can move out of the way. A chopping board that fits over the sink or hob does the same job in a kitchen with no floor to spare.
Step 9: Tame the under-sink cupboard
Pipes make this the most awkward space in the kitchen. Work around them with a two-tier organizer or stacking bins. Keep cleaning products in a caddy you can lift out, and store bin bags on a roll holder on the door.
Products that can help
Buy after you have decluttered and measured, and start with shelf risers, because they solve the most common problem.
Best for using the empty top half of a cupboard shelf
Expandable cupboard shelf riser
A freestanding platform that splits one shelf into two levels. This is a type of product, not one model. The button opens the retailer's results for it, so compare a few before you choose.
What we like
- Creates a second level for plates, bowls, mugs or tins
- Nothing to fix to the cupboard
- Expandable models adjust to the cupboard's width
What to know
- Measure the shelf height first: tall risers do not fit short gaps
- Wire tops can let small items tip
- Does little for tall items such as cereal boxes
United States
United Kingdom
Not listed with our CA retailers yet.
Not listed with our AU retailers yet.
Research-based recommendation: we have not tested this product ourselves. How we evaluate products. Details checked October 2026.
Best for the awkward cupboard under the sink
Two-tier under-sink organizer with pull-out basket
Two stacked baskets, the lower one sliding out, designed to sit beside the pipes. This is a type of product, not one model. The button opens the retailer's results for it, so compare a few before you choose.
What we like
- Brings the back of the cupboard to the front
- Narrow enough to fit beside the waste pipe
- Freestanding
What to know
- Measure the clear width beside the pipes before ordering
- Light plastic versions can flex under heavy bottles
- Will not fit cupboards with a low waste-disposal unit
United States
United Kingdom
Not listed with our CA retailers yet.
Not listed with our AU retailers yet.
Research-based recommendation: we have not tested this product ourselves. How we evaluate products. Details checked October 2026.
Best for kitchens with no pantry
Over-the-door pantry organizer rack
A rack of shallow baskets that hangs over a door and turns it into shelving. This is a type of product, not one model. The button opens the retailer's results for it, so compare a few before you choose.
What we like
- Adds several shelves without using floor or wall space
- Hangs on the door: no drilling
- Keeps tins and bottles visible
What to know
- Check the door's thickness and the gap above it, or the door may not close
- Can rattle when the door moves unless secured at the bottom
- Heavy loads strain door hinges: keep to the stated limit
United States
United Kingdom
Not listed with our CA retailers yet.
Not listed with our AU retailers yet.
Research-based recommendation: we have not tested this product ourselves. How we evaluate products. Details checked October 2026.
Common mistakes to avoid
- Buying organizers before measuring. Measure the inside of each cupboard first.
- Decanting everything. Matching jars look good but take time to maintain. Decant only what you buy in bulk.
- Keeping appliances you do not use. If it has not left the cupboard this year, it is taking the place of something that would.
What to do next
Live with the new layout for a week, then adjust anything that feels awkward. You may find you need less than you thought. For the rest of the apartment, see 21 small apartment storage ideas, and for fixings that will not mark the walls, 25 ways to improve your rental without losing your deposit.
Frequently asked questions
How do I create more counter space in a small kitchen?
Clear everything that is not used daily, then add a board that fits over the sink or hob, or a slim rolling cart if you have floor space.
What should not be stored on kitchen counters?
Anything you use less than daily. Rarely used appliances, decorative items and bulk food take up working space and make cleaning harder.
How can I add kitchen storage without drilling?
Use shelf risers, under-shelf baskets, over-the-door racks, magnetic racks on the fridge, adhesive hooks rated for the weight and a freestanding cart.
How do I organize a small kitchen with no pantry?
Pick one wall cupboard as the food cupboard and fit it with shelf risers. Add an over-the-door rack on the nearest door for tins and bottles, and keep bulk items elsewhere.
Are shelf risers worth it?
Yes, for short items. Plates, bowls, mugs and tins rarely use the full height of a shelf, and a riser turns that empty air into a second level.
Related articles
Storage & Organization
Small Kitchen Organization Guide
Organize a small kitchen around how you cook: zones for prep, cooking and cleaning, a clear worktop, cupboards that use their full height and a fridge you can see into.
Storage & Organization
21 Small Apartment Storage Ideas
Twenty-one places to find storage in a small apartment, room by room, with nothing that needs a drill unless you are allowed to use one.
Storage & Organization
How to Maximize Vertical Storage
In a small apartment the walls, the backs of doors and the gap above every shelf are storage you are not using. How to use height without drilling.